 Pin It
 My cousin called me three weeks before her graduation asking if I could make her cake, and my first thought was panic—then inspiration. She wanted something that looked as polished as her accomplishment, something that would photograph well for all those social media posts, and honestly, something that screamed celebration without being overdone. I'd never made an ombre cake before, but there was something about layering colors from dark to light that felt like the perfect visual metaphor for how far she'd come.
I remember setting up my kitchen the morning of that graduation party, and my hands were actually shaking a little while I divided that batter into four bowls. My mom wandered in asking if I needed help, and I just needed her to watch while I added drops of gel coloring, getting progressively bolder with each bowl. When those four layers came out of the oven golden and bouncy, and I lined them up by color, she got this knowing smile—the kind that says 'you've got this.' That moment mattered more than the cake itself, somehow.
Ingredients
- All-purpose flour (3 1/4 cups): The foundation of a tender, reliable cake—nothing fancy, just quality matters here.
- Baking powder (2 1/2 tsp): This is what gives you that light, cloud-like crumb that makes people actually enjoy eating cake instead of just tolerating it.
- Salt (1/2 tsp): A tiny anchor that makes all the other flavors pop and keeps things from tasting one-dimensional.
- Unsalted butter, softened (1 cup): Room temperature is non-negotiable—cold butter won't incorporate properly and you'll end up with a dense, sad cake.
- Granulated sugar (2 cups): This creams with the butter to build structure and give you that tender crumb people crave.
- Large eggs, room temperature (4): Temperature actually matters here because cold eggs won't emulsify smoothly, and your batter will seize up.
- Vanilla extract (1 tbsp): Use real vanilla—the difference between extract and imitation is the difference between 'nice' and 'memorable.'
- Whole milk, room temperature (1 1/4 cups): Room temperature milk incorporates without shocking the batter and breaking the emulsion you've worked to build.
- Gel food coloring: Gel holds color better than liquid and won't dilute your batter the way drops can.
- Egg whites (6) and granulated sugar (1 1/2 cups) for buttercream: These heat together to create that silky, stable texture that regular buttercream just can't match.
- Unsalted butter, cubed (1 1/2 cups for buttercream): Soft butter incorporates into the meringue like it's meant to be there, creating something almost cloud-like.
Tired of Takeout? 🥡
Get 10 meals you can make faster than delivery arrives. Seriously.
One email. No spam. Unsubscribe anytime.
Instructions
- Set yourself up for success:
- Preheat your oven to 350°F and get all four pans ready with parchment—this matters because you want them ready when you are, no scrambling mid-batter. While the oven heats, pull your butter, eggs, and milk out if they're not already at room temperature; this is one of those steps that actually changes the outcome.
- Build your dry ingredients:
- Whisk together your flour, baking powder, and salt in a medium bowl, making sure there are no lumps hiding in the flour. This takes maybe two minutes but prevents you from overmixing later when you're combining wet and dry.
- Cream butter and sugar until it's fluffy:
- Beat them together for a solid three to four minutes until the mixture looks pale and light—this is where you're beating air into the batter, and it matters for texture. When you're done, it should look almost mousse-like and feel slightly grainy when you touch it.
- Add eggs one at a time like you mean it:
- Drop in one egg, mix until it's completely incorporated and the batter looks smooth again, then repeat—this prevents the batter from looking curdled and broken. It takes a bit longer but your crumb will thank you.
- Mix in your vanilla and start the wet-dry dance:
- Add vanilla to the butter mixture, then alternate adding your dry ingredients and milk, starting and ending with flour. Mix just until combined—overmixing develops gluten and makes your cake tough, which is the opposite of what you want.
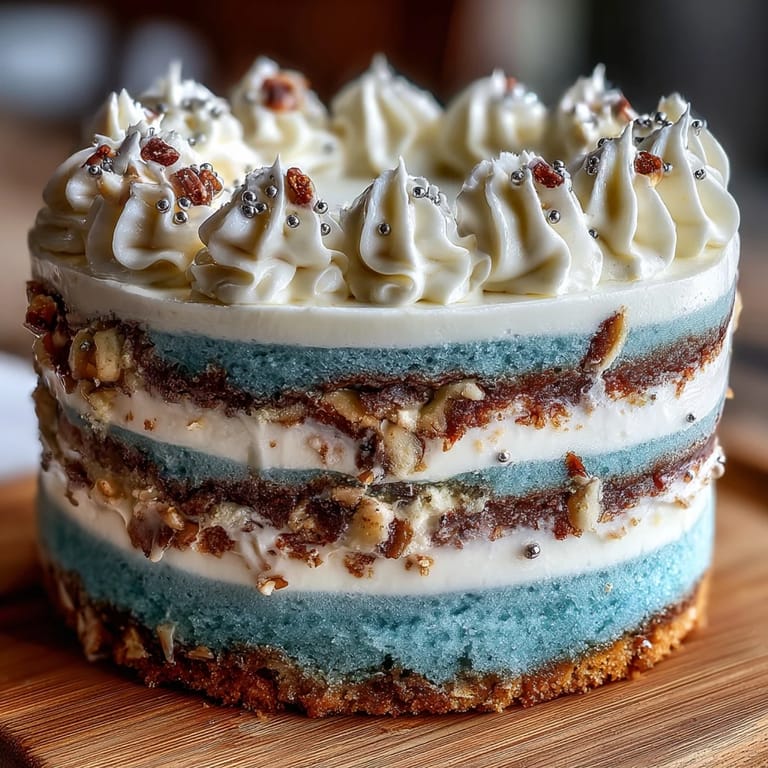
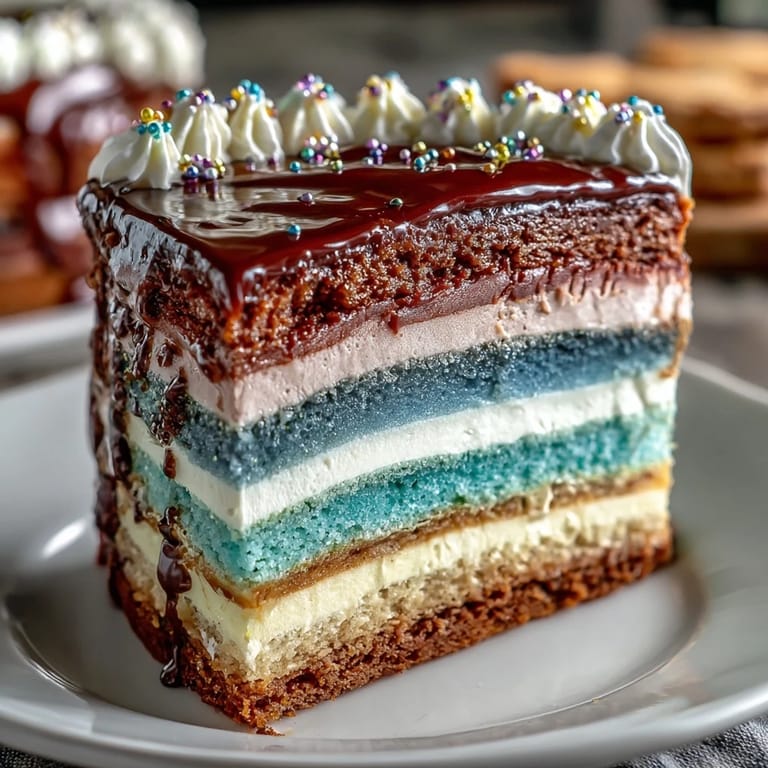
- Create your color gradient:
- Divide the batter evenly into four bowls and tint each with increasing amounts of gel coloring, starting with barely any in the first bowl and going bold with the last. The colors should look like a progression from light to dark, like a sunset.
- Fill and bake with patience:
- Pour each colored batter into its prepared pan, smooth the tops gently, and slide all four into the oven at once. Bake for 22 to 25 minutes until a toothpick comes out clean—don't open the oven door before 20 minutes, and don't skip this step because you'll deflate everything.
- Cool strategically:
- Let the cakes sit in their pans for 10 minutes so they set up enough to handle, then turn them out onto wire racks to cool completely. Trying to frost warm cakes is like trying to frost butter—everything melts and slides around.
- Make your Swiss meringue buttercream:
- Combine egg whites and sugar in a heatproof bowl set over simmering water, whisking constantly until the mixture reaches 160°F and the sugar feels completely dissolved. This takes about five to eight minutes and the constant whisking matters—you're dissolving the sugar, not cooking the eggs.
- Whip until it's cool and stable:
- Transfer the hot mixture to a stand mixer and whip on high speed for about ten minutes until stiff peaks form and the bowl is cool to the touch. You're aerating the meringue now, which is why it goes from glossy to pale and fluffy—this is the magic moment.
- Add butter gradually and with care:
- Add softened butter a few cubes at a time, beating well after each addition so it incorporates smoothly. If it looks greasy or broken at first, keep mixing—it will come together as the temperature evens out.
- Tint if desired:
- Add vanilla and tint portions of the buttercream with gel coloring if you want to mirror or complement your cake layers. You can leave it white for contrast or match the ombre theme—whatever feels right for your celebration.
- Layer from darkest to lightest:
- Trim any domed tops off your layers, then place the darkest layer on your cake stand and spread with a generous coat of buttercream. Stack the remaining layers from darkest to lightest, spreading buttercream between each one—this creates that visual impact when people see the layers.
- Apply a crumb coat and chill:
- Cover the whole cake with a thin layer of buttercream, smooth it as much as you can, and pop it in the fridge for 20 minutes. This seals in the crumbs so your final frosting stays pristine.
- Frost and decorate with intention:
- Apply your final layer of buttercream, blending colors for a seamless ombre if you're going that route, or keeping it simple and white. Add any decorations—edible pearls, a grad cap topper, piped details—then chill until everything is set and beautiful.
- Bring to room temperature before serving:
- Let the cake sit at room temperature for about 30 minutes before cutting so the crumb is tender and the frosting is silky. A cold cake is a dense cake, and that's not what you made this for.
 Pin It
 At the graduation party, watching my cousin cut into that cake and seeing the color gradient reveal itself felt like sharing a secret with everyone in the room. When people tasted it and their eyes lit up—not just because it looked amazing, but because it actually tasted like something worth celebrating—I realized this cake had become a story she'd tell about that day.
Why Ombre Layers Matter More Than You Think
The ombre effect isn't just pretty—it's visual storytelling. Each shade darker represents progress, growth, the journey from beginning to triumph, which is exactly what graduation means. When you slice into that cake, you're not just cutting through vanilla and buttercream; you're revealing a timeline that honors the person you're celebrating. It's one of those rare moments where presentation and meaning actually align perfectly.
The Swiss Meringue Buttercream Difference
Regular American buttercream is fine for everyday cakes, but Swiss meringue buttercream tastes like velvet feels—silky, stable, and rich without being cloying. The fact that you heat the eggs to a safe temperature means you're not taking food safety risks, and the whipping process incorporates so much air that the final frosting is almost cloud-like. It holds up beautifully in warm rooms, which matters when you're transporting a graduation cake to a party.
Color Strategy and School Spirit
Choosing your ombre colors can be practical or deeply meaningful—school colors turn the cake into a visual tribute, while classic blues or pastels work for any event. Think about what the graduate would feel proud seeing on their cake, and don't be afraid to ask them directly. The colors you choose become part of the memory, so this choice deserves a moment of thought.
- Gel coloring works best when you add a tiny amount and build up gradually rather than dumping a bunch in at once.
- Test your colors in a small scoop of batter first so you can see what they actually look like when baked, not just in the raw batter.
- If you want a chocolate ombre instead of colored, add cocoa powder in increasing amounts and reduce the milk slightly so the batter stays the right consistency.
 Pin It
 This cake exists to mark a moment that deserves marking, and the care you put into making it well says something about how much you value the person you're celebrating. Serve it with joy and watch it become part of their graduation story.
Recipe Questions & Answers
- → How do you achieve the ombre effect in the layers?
Divide the batter into several portions, then tint each with increasing amounts of gel food coloring to create a gradual gradient from dark to light.
- → What type of buttercream is used for frosting?
Swiss meringue buttercream is whipped until smooth and silky, then tinted with food coloring to complement the cake layers.
- → Can this cake be prepared in advance?
Yes, the layers and buttercream can be made ahead and chilled, allowing the cake to set properly before serving.
- → What tools are recommended for decorating the cake?
Use piping bags with decorative tips, offset spatula for spreading, and optionally edible pearls or themed toppers for finishing touches.
- → How should this cake be stored before serving?
Chill the cake after frosting to set the buttercream, then bring to room temperature before serving for the best texture and flavor.